Over the past three months, Christo started to give Health Talks once a month on a Monday evening at Eirene Health Shop. It appeared to be quite popular. The latest talk about Natural First Aid in the Home, being a full house of 25 people!
In the Natural First Aid in the Home talk, Christo shared mostly out of our personal experience of having a house full of children, six of them boys, who tries anything from climbing trees, falling out of swings, hitting their heads on stairs - leaving blood everywhere, stepping on bees, riding wild horses and getting thrown off; to unforeseen burns in the kitchen; to a mother who cut open her head while spring cleaning the house (LOL); to babies developing high fever or diarrhea in the middle of the night.
Christo demonstrated how to support a lightly injured arm or green wood fracture with apple cider vinegar, Traumeel S and lots of cotton wool.
He showed what he did with my head when I cut it a few weeks ago while spring cleaning the house. The application of yarrow (soldier’s bush) to instantaneously stop bleeding, cleaning the wound and ‘stitching the tissue’ with ordinary maizena.
Maizena saved us a few thousand rand, which would be what it would cost going to the emergency room for stitches, and I don’t have any stitch marks were the wound was.
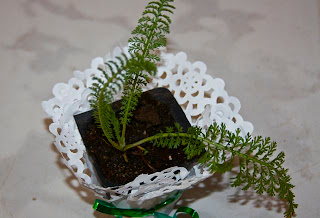
We also shared our well known remedies for shock and pain. Each attendee received a small Yarrow plant.
Don't miss out on these Health Talks.
Book now for December's In-Store Talk "How to Enjoy the Festive Season and Still be Healthy" on the 5th of December 19h00 - 20h30.
Every talk evening Heidi-Mari and I prepare a salt and sweet snack for the attendees. This month we gave Spinach packets made of croissant dough
and
Rolled Danish Pastries.
Both baked with spelt flour (thus wheat free) and whenever sugar is needed, Rapandura sugar.
To make the Spinach Packets you will need:
spinach filling (recipe below)
egg wash (1 egg and 1 egg yolk)
To make the spinach filling you will need::
300 g organic spinach (snipped into pieces)
1 onion (chopped)
2 tablespoons butter
1 cup organic ‘biltong’ (snipped into pieces)
1 cup plain cream cheese
½ t salt
black pepper to taste
3 eggs
100 ml organic cream
- In a saucepan, melt the butter. On medium heat add the onion, stirring occasionally until the onion is translucent.
- Turn up the heat, add the spinach and stir it around over high heat until it wilts and all extra liquid has evaporated.
- Add the biltong.
- In a separate bowl mixed together the cream cheese, salt, black pepper, eggs and cream.
- Add to the spinach.
- Allow to cool.
To make the packets:
- Line a sheet pan with baking paper. Roll the dough out big enough to fit into the sheet pan, about 5 mm thick, trim the rectangle to fit into the sheet pan and transfer it to the prepared sheet pan. Refrigerate the rectangle for about 20 minutes, or until firm but not brittle. Reserve the trimmings in the refrigerator, until firm.
- Cut the rectangle into 10 cm squares, put back into refrigerator.
- Roll the reserved trimmings into 15 cm long strips. Halve each strip and put back in refrigerator.
- When ready to fill the squares take 4 squares at a time, out of the refrigerator. Don’t allow the dough to get to room temperature, on a warm day.
- Put 2 slightly rounded teaspoons of spinach in the center of each square.
- Fold one corner over the filling and brush the tip with egg wash.
- Fold the opposite corner over the first and press gently to seal them.
- Brush the top with egg wash, fold up another corner, brush with egg wash again, and fold up the last corner. Gently push down on the center to hold the flaps together. Pinch the corners and edges to seal them.
- Take 8 strips at a time out of the refrigerator and place 2 strands over each packet and tuck them underneath.
- Place the packets on a sheet pan, lined with baking paper and cover with plastic wrap.
- Let proof until the dough’s almost twice as thick, about 1 hour.
- Preheat the oven to 200 degrees C. Brush the packets with egg wash. Bake for about 20 minutes, then check whether the pastries are browning too quickly; if so, turn down the oven to 160 degrees C. Bake for about 10minutes longer, or until golden brown.
- Serve warm or at room temperature.
For the Rolled Danish Pastries you will need:
1 cup hazelnut frangipane (recipe below)
2 tbsp rapandura sugar
3 tbsp hazelnuts, crushed
3 tbsp raisins
2 tbsp finely grated cacao
½ tsp ground cinnamon
egg wash
apricot glaze
To make the hazelnut frangipane:
1 cup hazelnuts (peeled as much as possible)
3 tbsp rapandura sugar
1 tbsp cornstarch or maizena
1 egg
2 tbsp butter
Peeling Hazelnuts: Roast the nuts in a 180 degrees C oven for 15 minutes. while still hot, rub them vigorously together between two towels.This procedure gets rid of most of the peel.
- Grind together the hazelnuts and sugar in a food processor.
- Add the cornstarch and egg and process for about 1 minute, or until smooth.
- Add the butter and process for 30 seconds more.
Making the Rolled Danish Pastries:
- Line a sheet pan with baking paper. Roll the dough out big enough to fit into the sheet pan, about 5 mm thick, trim the rectangle to fit into the sheet pan and transfer it to the prepared sheet pan. Refrigerate the rectangle for about 20 minutes, or until firm but not brittle.
- Spread the hazelnut frangipane over the rectangle in an even layer.
- Mix together the sugar, crushed hazelnuts, raisins, grated cacao and ground cinnamon.
- Sprinkle the above mixture over the hazelnut frangipane.
- Begin rolling up the rectangle by pinching it along one short end.
- Continue rolling, as tight as you can, alternating between tucking under the dough with your fingers and rolling it with the flats of your hands, until you’ve rolled it up into a log.
- Line sheet pans with baking paper.
- Slice the roll into rounds by sliding a piece of fishing line under one end of the log and
- pulling the two ends across each other.
- Truck the little flap of dough from the end of the roll under the center to hold it in place and arrange the rounds on sheet pans, leaving at least 5 cm between each one to allow for expansion. Cover with plastic wrap and let proof until each layer of dough has expanded by 50 percent, about 1 hour.
- Preheat the oven to 200 degrees C. Brush the pastries with egg wash. Bake for about 20 minutes, then check whether they’re starting to get too brown. If so, turn down the oven to 160 degrees C. Bake for about 15 minutes longer, or until golden brown.
- Remove the pastries from the oven and brush with the glaze while still hot.
I’m entering the Spanish Packets in Heidi-Mari’s Fortnightly Baking Fun Challenge.
This fortnightly theme is Anything Goes!
Bon Appetite!
Linnie


